★ TUTORIAL: CUTTING OUT CIRCLES
Posted on 1/2/12 @ 11:20:00 p. m. | Posted by Katu
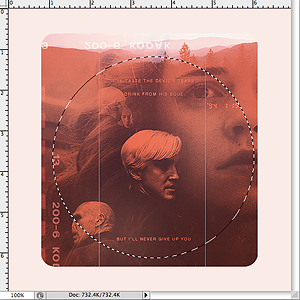
• First, take the image you want to cut the circle out of. (I don’t have my original sidebar image before I cut
the circle out, so i’ll be using a new picture.)
the circle out, so i’ll be using a new picture.)

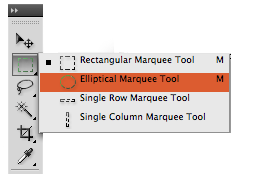
• Click on your Selection Marquee Tool (M). It should be on the rectangle shape by default. Click and
hold until the other options show up. Select the Elliptical one.
hold until the other options show up. Select the Elliptical one.
• Now, roughly determine the center of your image. THIS IS NOT THAT IMPORTANT. Because you can
move this circle later. But to save yourself time, roughly try and find the centerpoint of where you want your
circle.
move this circle later. But to save yourself time, roughly try and find the centerpoint of where you want your
circle.
• Before you click and drag, hold down the SHIFT key and the ALT/OPTION key AT THE SAME
TIME. The shift key will keep the selection a perfect circle, and the alt/option key will make it come out
from the center.
TIME. The shift key will keep the selection a perfect circle, and the alt/option key will make it come out
from the center.

• Once these keys are held down, you will simultaneously click and drag. Your circle should be growing
now. Make it was big as you want to include as much of the image as you need.
now. Make it was big as you want to include as much of the image as you need.
• Now, if you need to move the circle, don’t unlick and start over. WHILE STILL holding down the SHIFT
and ALT/OPTION keys and the mouse, ALSO hold down theSPACEBAR. Holding down the spacebar
will allow you to move the selection around to get it exactly where you want it.
and ALT/OPTION keys and the mouse, ALSO hold down theSPACEBAR. Holding down the spacebar
will allow you to move the selection around to get it exactly where you want it.
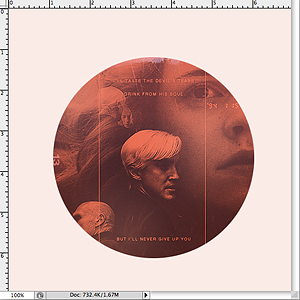
• Once you’ve got your selection at the perfect size and position, let go of all keys/unclick. Bolder “selection
ants” should now appear. At this point, you can either inverse the selection and delete everything around the
circle. Or you can clickCONTROL/COMMAND + J and the circle will become a new layer by itself.
You can now delete the base image and add a background color that matches your theme background if
you’re using it for a sidebar image. :)
Etiquetas: Tutoriales
1 bananas

 dulces
  , abrazos, manga, anime, k-pop, j-rock, kawaii
  , pikachu, pokémon,
  , animales
  , ropa, Tsunami, Zelo,
 。。。
。。。 Bullying, comida picante, zanahoria, maltrato animal, tabaco,


 dulces, abrazos, manga, anime, k-pop, j-rock, kawaii , pikachu, pokémon, japón, amor, animales , Tsunami, Zelo, frío, verano, lluvia, Laptop, psp, Coco, vainilla, gorros, guantes, sandía, tranquilidad, CHOCOLATE , Vocaloid
 Bullying, comida picante, zanahoria, maltrato animal, tabaco,